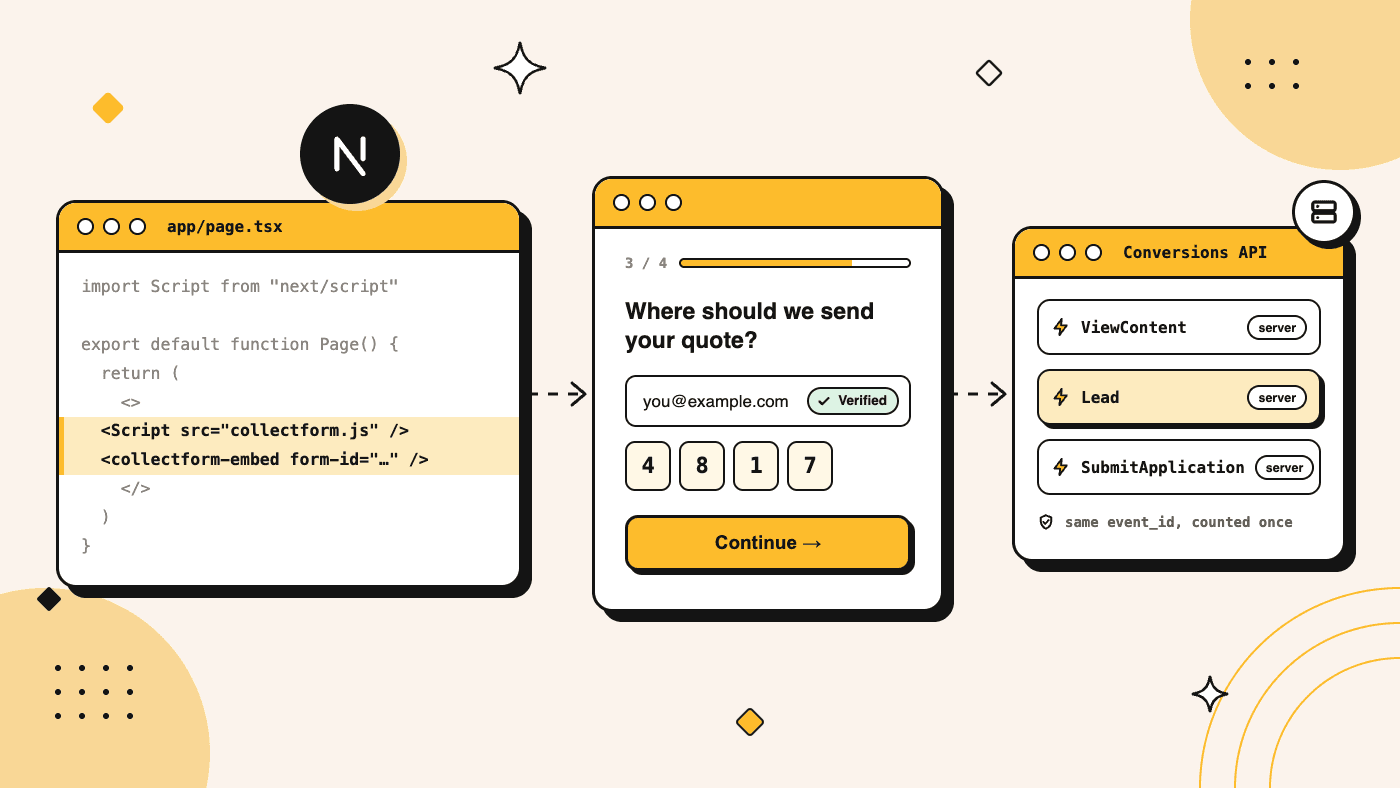
Meta says advertisers with a Conversions API setup for web events saw an average 17.8% lower cost per result than those without one.
Then you open the docs. Four required fields, plus two more for website events. Eleven customer fields to hash, most with their own rule for cleaning them first. Four browser signals you must not hash. A 48-hour window for matching the browser copy of each event to the server copy.
I've built this in Next.js twice. The first time was for Collectform itself, which is a Next.js app. Its server-side Meta and TikTok code now runs to 729 lines across 3 files.
The second time was for this guide, as small as I could make it while doing it properly. It came to 146 lines across 7 files, not counting blank lines.
Both work. But if the conversion you care about is a form, you don't need to write either one. So the 2-line way comes first. The custom build, tested step by step, comes second.
The short version:
- Server-side tracking means sending each conversion twice. Once from the browser with the Pixel, once from a server to the Conversions API, with the same event ID so Meta keeps one.
- The Collectform way is 2 lines plus an import. You paste your Pixel ID and access token, map fields from a dropdown, pick an event for each step, and turn on email verification. There's no backend to build.
- The custom way is an env file, 5 new files and an edit to your layout: the Pixel, a server-only helper that hashes and sends, a Route Handler, a
proxy.tsthat saves the ad click ID, and the form. - With Meta's Pixel blocked, the way an ad blocker blocks it, the custom build's server event still went out with a hashed email and phone, the visitor's IP and user agent, and the click ID.
- Use the first for forms and the second for everything else, like checkouts and sign-ups inside your app.
What "server-side" actually means
Here is the whole idea in three steps:
- A visitor submits your form. The browser fires
fbq("track", "Lead", {}, { eventID })through the Pixel. - The browser also tells a server, and that server sends the same
Lead, with the same ID asevent_id, to Meta's Conversions API. - Meta sees both, matches them on event name and ID, and keeps one.
If an ad blocker stopped step 1, step 2 still arrives.
The Pixel is the copy ad blockers stop. The server copy goes from a server to Meta, where no browser extension can reach it.
That is also why the Conversions API needs a server at all. It authenticates with an access token, and anyone who can see your JavaScript can see anything you put in it.
The Collectform way: 2 lines of code
Collectform is a form with that server side already built: the hashing, the event IDs, the cookies and the call to Meta. It's the part of my 729 lines you don't have to write.
Step 1: Build your form
Build it in the drag-and-drop editor, or start from a template. Every question is its own screen, so forms are multi-step by default, and the logic builder routes people by their answers. There's no step state to manage in React.
Here's a 3-step form, running live. It's in preview mode, so nothing you enter is saved or tracked:
Step 2: Add it to your page
// app/contact/page.tsx
import Script from "next/script"

export default function ContactPage() {
  return (
    <>
      <Script type="module" crossOrigin="anonymous" src="https://cdn.collectform.com/collectform.js" />
      <collectform-embed form-id="YOUR_FORM_ID" />
    </>
  )
}
It works in a Server Component, with no "use client". TypeScript projects add one small type file, shown in the Next.js contact form guide.
Step 3: Connect Meta
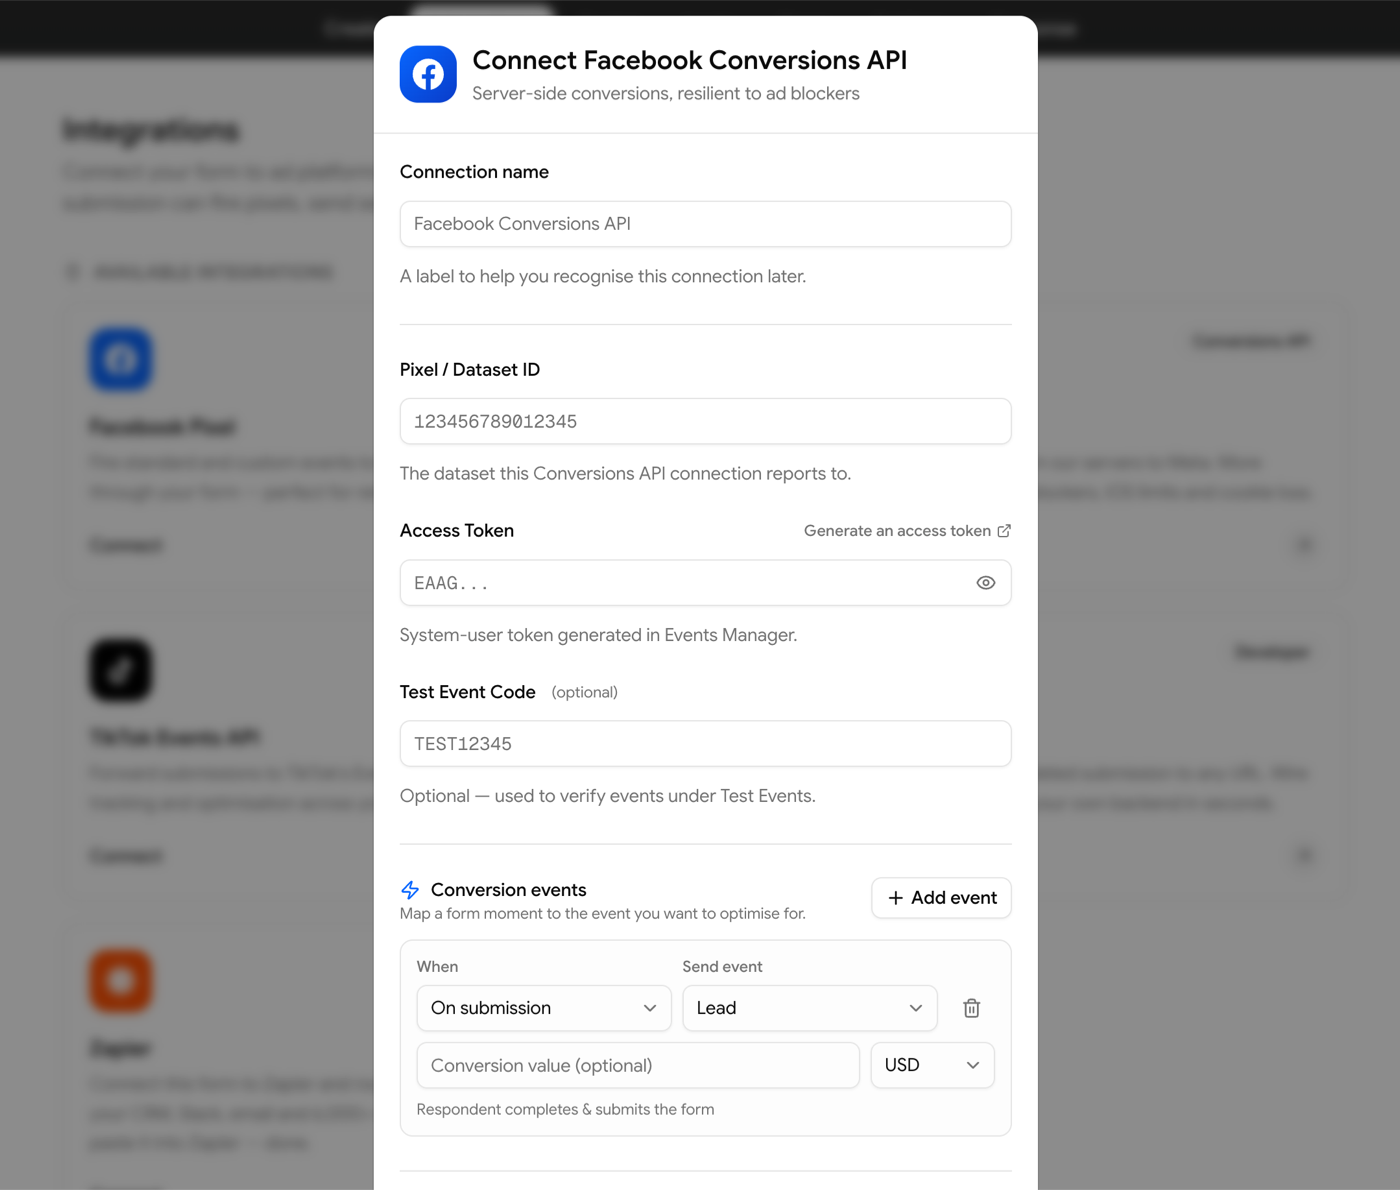
Open the form's Integrations tab and choose Facebook Conversions API. Give the connection a name, then paste two things from Meta Events Manager:
- Your Pixel ID, which Meta also calls the dataset ID.
- An access token. Open your dataset, go to Settings, and generate one under Conversions API. The Generate an access token link in the dialog opens Meta's guide.
While you test, add the code from the Test events tab as the Test Event Code.
A new connection already sends Lead on submission, so it works before you change anything else. Your token stays in Collectform. It's never part of the public form, and it never touches your Next.js code.
You don't add any Pixel code for the form's events either. Collectform sends the server event and fires the browser copy through Meta's Pixel with the same event ID. If your page already loads the Pixel, it uses yours.
Step 4: Check the field mapping
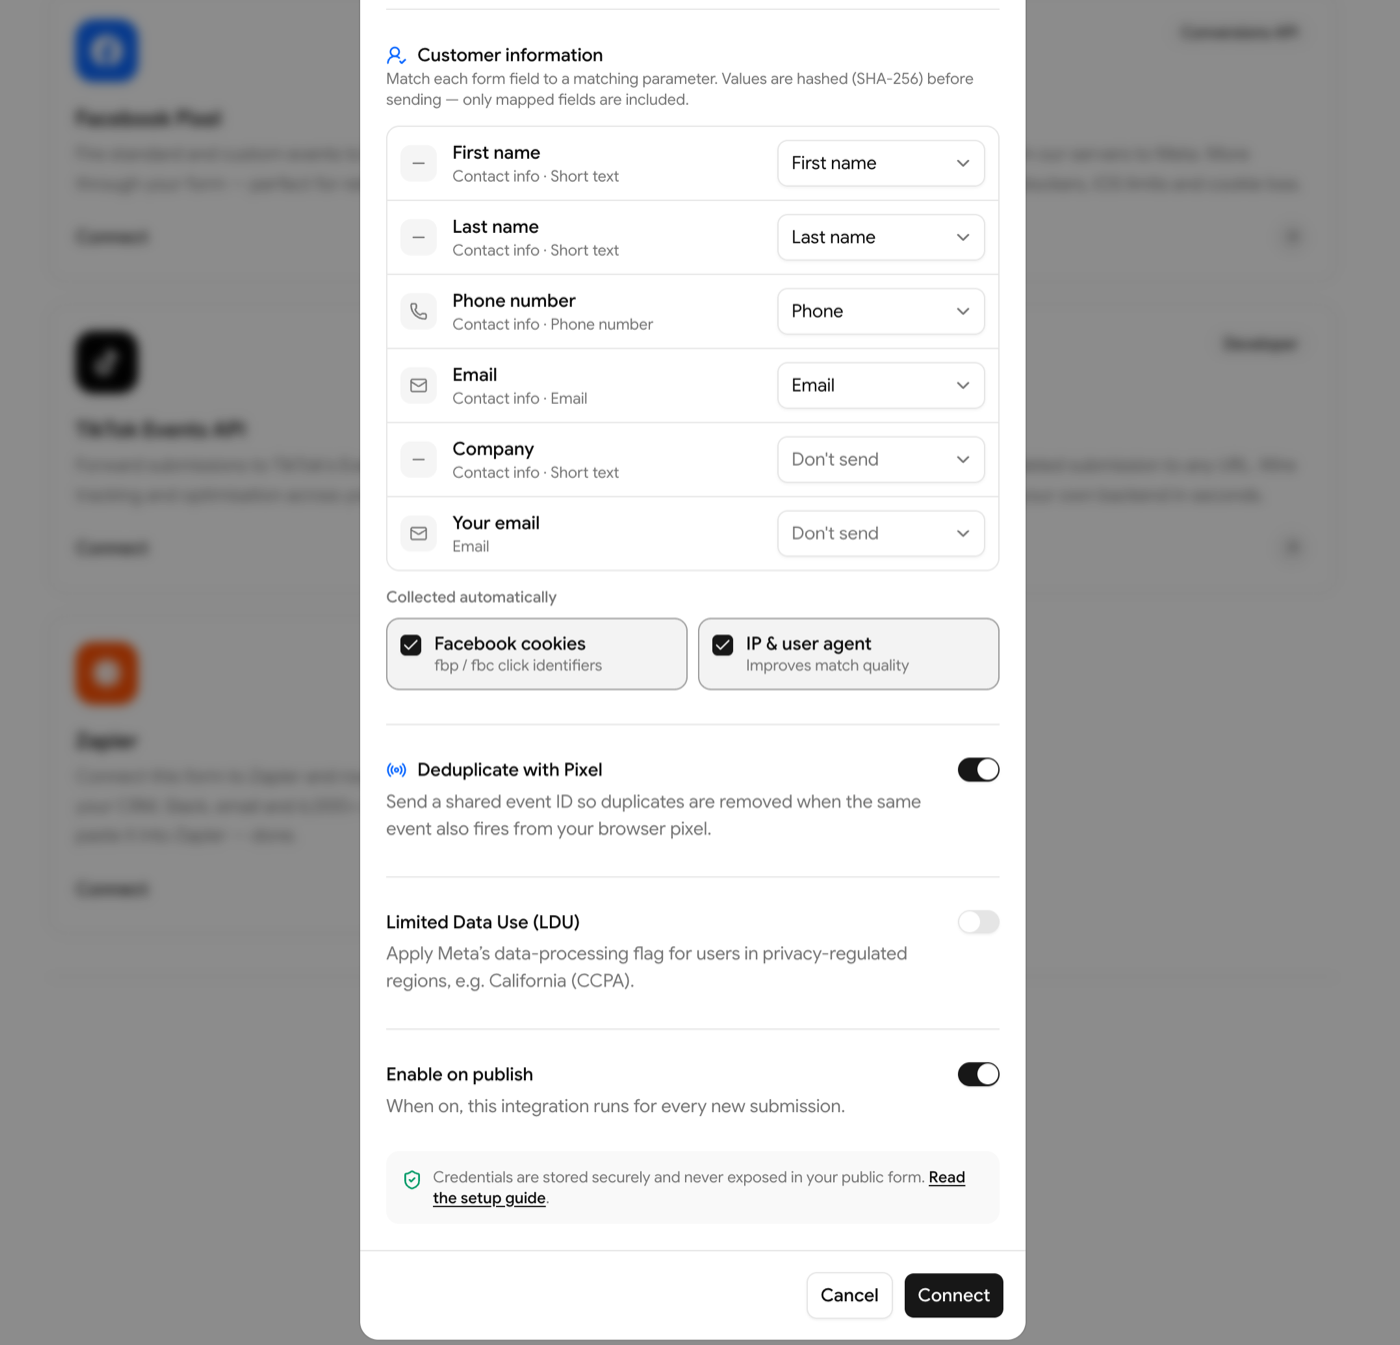
Every input field in your form gets a dropdown with Meta's 11 matching parameters: email, phone, first and last name, city, state, zip, country, date of birth, gender and external ID. When you connect, Collectform fills in email, phone, first name and last name wherever it can tell which field is which. Everything else starts as Don't send, so nothing goes to Meta unless you chose it.
Fields inside a Contact Info block get a row each, as you can see above. Email, phone and the two names can each map to one field only. In this form the Contact Info email took Email, so the separate "Your email" question starts at Don't send. Pick Email there and the mapping moves to it.
Collectform trims, lowercases and SHA-256 hashes each value on its server, and cuts phone numbers down to digits. Its phone field stores the country code, so the number is ready for matching.
Below the fields:
- Facebook cookies (fbp and fbc) and IP & user agent are collected automatically. Both start on.
- Deduplicate with Pixel starts on too. It's the shared event ID from the top of this post.
- Limited Data Use is one switch, for visitors in places like California.
Step 5: Pick an event for each step
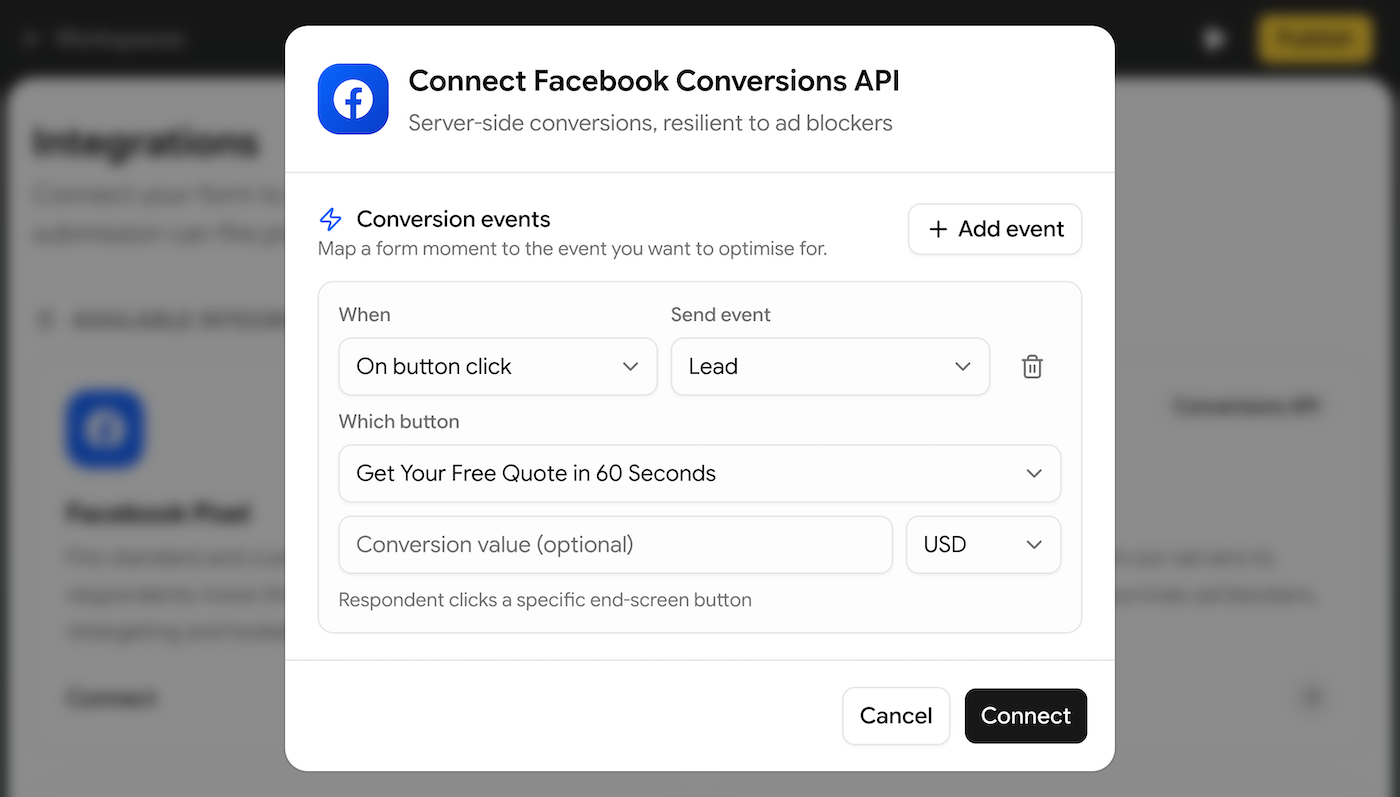
Most setups fire one event when a form is submitted. Collectform lets each moment fire its own:
- On form view: the form loads.
- On form start: the visitor answers the first question.
- On submission: they finish.
- On button click: they press the button on a step you pick from a list.
Each event can be a Meta standard event, like Lead, Contact, SubmitApplication or Schedule, or a custom name you type. Each can carry a value and currency. A button-click event fires once per step in a visit and carries the answers given so far, so a step after your email question sends a hashed email with it.
Here's how I'd set up a 4-step quote form:
| When | Send event | What it tells Meta |
|---|---|---|
| On form view | ViewContent | Someone saw the form |
| On form start | Custom: QuoteStarted | They answered the first question |
| On button click: "Where should we send your quote?" | Lead | They proved their email works |
| On submission | SubmitApplication | They finished the whole form |
Add logic and it gets sharper. Send budgets over $5,000 to a "Pick a time for a call" step and map that step's button to Schedule. Only the visitors your logic sends there can fire it. For more ways to use this, see granular button mapping and advanced matching.
Step 6: Verify emails before the Lead fires
That third row is the one I'd copy.
Turn on Email Verification on an Email question and the visitor gets a 4-digit code by email. The step doesn't move on until they type it in. Map your Lead to that step's button, and it only fires after the right code is entered.
That matters for ads. Every Lead you send teaches Meta who to show your ads to next. A Lead with a made-up address can never match a Meta account, and it still teaches.
It isn't a CAPTCHA, though. A real person can still type something useless into your other fields. And verification works on the standalone Email question, not on the email field inside a Contact Info block.
Step 7: Publish and test
Hit Publish, submit the form on your site, and open Test events in Events Manager. You should see your events arrive. Then remove the test code from the connection, because Meta says the test field is for testing only.
From then on, changing an event or a field map is an edit and a Publish. No deploy.
One optional extra: if you want the click ID even when an ad blocker stops the Pixel, add the proxy.ts from Step 5 of the custom build below. Collectform reads the same _fbc cookie.
The rest is built in too:
- TikTok Events API, with a Copy from… button that copies your Meta events and mapping across.
- More than one Pixel. Add another connection, with its own events and mapping.
- A cookie consent banner. Turn it on and the Pixel and server events wait until the visitor accepts.
- The
fbpandfbceach response arrived with, saved next to its answers.
The custom way: build it in Next.js
Not tracking a form? A checkout, a sign-up inside your app or a purchase needs your own code. Here's mine.
I built this in a fresh Next.js 16.4.5 app with the App Router. It passes strict TypeScript and next build.
Step 1: Get your Pixel ID and an access token
Get them from Events Manager, the same way as in the Collectform setup above, and put them in .env.local:
# .env.local
NEXT_PUBLIC_META_PIXEL_ID=123456789012345
META_CAPI_TOKEN=EAAG...
META_TEST_EVENT_CODE=TEST12345
The token has no NEXT_PUBLIC_ prefix, so Next.js keeps it on the server and never puts it in the browser bundle. The Pixel ID is public anyway. The test code comes from the Test events tab, and you delete that line before you go live.
Step 2: Load the Pixel
This is Meta's standard base code, loaded with next/script. Inline scripts need an id so Next.js can track them.
// components/meta-pixel.tsx
import Script from "next/script"

export function MetaPixel() {
  return (
    <Script id="meta-pixel" strategy="afterInteractive">
      {`!function(f,b,e,v,n,t,s){if(f.fbq)return;n=f.fbq=function(){n.callMethod?
      n.callMethod.apply(n,arguments):n.queue.push(arguments)};if(!f._fbq)f._fbq=n;
      n.push=n;n.loaded=!0;n.version='2.0';n.queue=[];t=b.createElement(e);t.async=!0;
      t.src=v;s=b.getElementsByTagName(e)[0];s.parentNode.insertBefore(t,s)}(window,
      document,'script','https://connect.facebook.net/en_US/fbevents.js');
      fbq('init', '${process.env.NEXT_PUBLIC_META_PIXEL_ID}');
      fbq('track', 'PageView');`}
    </Script>
  )
}
Then render it once in your root layout:
// app/layout.tsx
import { MetaPixel } from "@/components/meta-pixel"

// ...and inside <body>:
<MetaPixel />
Step 3: Hash and send from the server
This helper does the part Meta is strictest about. Contact details have to be normalized, then SHA-256 hashed: email trimmed and lowercased, phone cut down to digits with the country code. The IP, user agent, fbp and fbc go as they are.
npm install server-only
// lib/meta-capi.ts
import "server-only"
import { createHash } from "node:crypto"

const PIXEL_ID = process.env.NEXT_PUBLIC_META_PIXEL_ID
const ENDPOINT = `https://graph.facebook.com/v27.0/${PIXEL_ID}/events`

const sha256 = (value: string) => createHash("sha256").update(value).digest("hex")

export type MetaEvent = {
  eventName: string
  eventId: string
  eventSourceUrl: string
  email?: string
  phone?: string
  ip?: string
  userAgent?: string
  fbp?: string
  fbc?: string
}

export async function sendMetaEvent(event: MetaEvent) {
  const userData: Record<string, string | string[]> = {}

  // Meta won't accept contact details unhashed. Normalize, then SHA-256.
  if (event.email) userData.em = [sha256(event.email.trim().toLowerCase())]
  // Digits only, no leading zeros, and it must include the country code.
  if (event.phone) userData.ph = [sha256(event.phone.replace(/\D/g, "").replace(/^0+/, ""))]

  // These four go as they are. Hashing them breaks matching.
  if (event.ip) userData.client_ip_address = event.ip
  if (event.userAgent) userData.client_user_agent = event.userAgent
  if (event.fbp) userData.fbp = event.fbp
  if (event.fbc) userData.fbc = event.fbc

  const res = await fetch(ENDPOINT, {
    method: "POST",
    headers: { "Content-Type": "application/json" },
    body: JSON.stringify({
      data: [
        {
          event_name: event.eventName,
          event_time: Math.floor(Date.now() / 1000),
          event_id: event.eventId,
          action_source: "website",
          event_source_url: event.eventSourceUrl,
          user_data: userData,
        },
      ],
      access_token: process.env.META_CAPI_TOKEN,
      // Set only while testing. When it's unset, JSON.stringify drops it.
      test_event_code: process.env.META_TEST_EVENT_CODE,
    }),
  })

  if (!res.ok) throw new Error(`Meta CAPI ${res.status}: ${await res.text()}`)
}
import "server-only" makes the build fail if a Client Component ever imports this file, which is the cheapest insurance you'll find for an access token. v27.0 is the Graph API version in Meta's current examples.
Step 4: Add the Route Handler
The browser calls this route. It adds what only the server knows, then hands off to the helper.
// app/api/meta/route.ts
import { after } from "next/server"
import { cookies, headers } from "next/headers"
import { sendMetaEvent } from "@/lib/meta-capi"

// Anyone can POST to this route, so only accept the events you expect.
const ALLOWED_EVENTS = new Set(["Lead"])

export async function POST(request: Request) {
  const body = await request.json().catch(() => ({}))
  if (!ALLOWED_EVENTS.has(body.eventName) || typeof body.eventId !== "string") {
    return Response.json({ error: "Unknown event" }, { status: 400 })
  }

  const cookieStore = await cookies()
  const headerList = await headers()

  const event = {
    eventName: body.eventName,
    eventId: body.eventId,
    eventSourceUrl: String(body.url),
    email: body.email,
    phone: body.phone,
    // The visitor's IP on Vercel and most hosts. Check yours.
    ip: headerList.get("x-forwarded-for")?.split(",")[0].trim(),
    userAgent: headerList.get("user-agent") ?? undefined,
    fbp: cookieStore.get("_fbp")?.value,
    fbc: cookieStore.get("_fbc")?.value,
  }

  // Answer the browser now. The Meta call runs after the response.
  after(() => sendMetaEvent(event).catch(console.error))

  return Response.json({ ok: true })
}
Two Next.js 16 details matter here. cookies() and headers() are async, so you await them. And after() runs the Meta call once the response has gone, so the visitor never waits on Meta. In my test the route answered in 64 ms, while a simulated 1.5-second Meta call ran after it.
The allow-list matters too. This route is public. Without the list, anyone could send your Pixel a Purchase. With it, the worst they can send is a Lead.
Step 5: Save the click ID in proxy.ts
When someone clicks your ad, the URL arrives with ?fbclid=. The Pixel normally turns that into the _fbc cookie. When an ad blocker stops the Pixel, nobody does, and your server event loses its best click signal.
So save it yourself. In Next.js 16, middleware.ts is now proxy.ts.
// proxy.ts
import { NextResponse, type NextRequest } from "next/server"

// Ad clicks land with ?fbclid=. Saving it as _fbc here means the server
// still has the click ID when an ad blocker stops the Pixel.
export function proxy(request: NextRequest) {
  const response = NextResponse.next()
  const fbclid = request.nextUrl.searchParams.get("fbclid")
  const current = request.cookies.get("_fbc")?.value

  if (fbclid && !current?.endsWith(`.${fbclid}`)) {
    response.cookies.set("_fbc", `fb.1.${Date.now()}.${fbclid}`, {
      maxAge: 60 * 60 * 24 * 90,
      sameSite: "lax",
      secure: true,
    })
  }
  return response
}

export const config = {
  matcher: ["/((?!api|_next/static|_next/image|favicon.ico).*)"],
}
The format is Meta's own: fb, then 1 for a server-generated value, then the time in milliseconds, then the fbclid exactly as it arrived. It's case sensitive, so never lowercase it. A repeat visit from the same click keeps the first timestamp, and a new click replaces it.
If you need consent before setting ad cookies, put this and the Pixel behind your consent check. Our deeper guide covers capturing fbp and fbc.
Step 6: Fire both copies from the form
One ID, two copies. Same event name in both.
// components/lead-form.tsx
"use client"

declare global {
  interface Window {
    fbq?: (...args: unknown[]) => void
  }
}

export function LeadForm() {
  async function sendLead(data: FormData) {
    // One ID for both copies of the event, so Meta keeps one.
    const eventId = crypto.randomUUID()

    window.fbq?.("track", "Lead", {}, { eventID: eventId })

    await fetch("/api/meta", {
      method: "POST",
      headers: { "Content-Type": "application/json" },
      body: JSON.stringify({
        eventName: "Lead",
        eventId,
        url: location.href,
        email: data.get("email"),
        phone: data.get("phone"),
      }),
    })

    // Then save the lead somewhere and show a thank-you message.
  }

  return (
    <form action={sendLead}>
      <input name="email" type="email" placeholder="[email protected]" required />
      <input name="phone" type="tel" placeholder="+1 555 010 0000" />
      <button type="submit">Get my quote</button>
    </form>
  )
}
That last comment is doing a lot of work. This form tracks the lead, but it doesn't save it, validate the phone number or email anyone.
Step 7: Test it in Events Manager
With META_TEST_EVENT_CODE set, submit the form and open Test events in Events Manager. You should see Lead arrive from both the browser and the server. Then delete the test code from your environment and redeploy, because Meta says the test field is for testing only.
After real traffic, check the event's Event Match Quality score. Sending more matched fields can raise it, which we unpack in how to improve Event Match Quality.
What I tested in the custom build
I ran the app in Chrome and blocked every request to Meta's domains, the way an ad blocker would. Then I landed on the page from a fake ad click, ?fbclid=IwAR_TestClick123.
- The proxy saved the click ID as
fb.1.1794065313444.IwAR_TestClick123: a 13-digit millisecond timestamp, readable by the Pixel, kept for 90 days. The same click again kept that timestamp. A new click replaced it. - The browser queued
fbq("track", "Lead", {}, { eventID }), which never left the page, because the Pixel script was blocked. - The server event went out anyway, with the same
event_id. I typed[email protected]and+1 (555) 010-0000, and the hashes matched SHA-256 of[email protected]and15550100000. - It carried the raw
fbc, the IP and the user agent. Nofbp, because only the Pixel creates it. - An unknown event name or a broken body got a 400, and nothing was sent.
What I didn't do was point it at a live Pixel. I captured the outgoing request on my machine instead of sending it to Meta, so Step 7 is the one you run yourself.
Seven ways the custom build quietly breaks
- The token gets a
NEXT_PUBLIC_prefix. Next.js then inlines it into the JavaScript every visitor downloads. - The two copies don't match.
Leadin one andleadin the other, or a fresh ID for each copy. Meta needs both the name and the ID to match. - Something gets hashed that shouldn't be.
fbp,fbc, IP and user agent go raw. Hashing them doesn't protect anyone. It just stops them matching. - Phone numbers without a country code. Meta says it needs the country code for matching, even if all your customers are in one country.
- No user agent or source URL. Meta's best practices list both
client_user_agentandevent_source_urlas required for every website event. - The test code ships to production. Meta says to remove it from production payloads, and it's easy to forget an environment variable.
- Expecting a
PageViewon every route. The base code fires once per full page load. App Router navigations don't reload the page, so they don't fire it.
Side by side
| Collectform | Custom build | |
|---|---|---|
| Code in your app | 2 lines plus an import | 146 lines, 7 files, 1 package |
| Access token | Stored in Collectform | Your environment variables |
| Hashing | Built in | You write and maintain it |
| fbp, fbc, IP, user agent | Two checkboxes | You collect them |
| A different event per step | Pick a step from a list | A new call for each step |
| Email verification | A switch on the Email question | You build it |
| Changing an event | Edit and publish | Code change and deploy |
| Tracks the rest of your site | No, only the form | Yes |
A few honest caveats
Collectform tracks the form, not your site. Sign-ups inside your app, checkouts and purchases still need your own route, like the one above. Plenty of Next.js apps should run both.
Meta now has a no-code option. In April 2026 Meta announced a one-click Conversions API setup with "no technical expertise, no costs, no ongoing maintenance." If your Pixel already sees every event you care about, try that before you write any code.
Server-side doesn't mean unblockable. Both setups start in the browser. Collectform's form calls Collectform, and my custom build calls /api/meta. If the visitor's browser never runs your JavaScript, nothing goes anywhere. What server-side fixes is the blocked Pixel script.
Your responses live in Collectform. If you want them in your own database too, send them there with a webhook.
And I'm biased. I build Collectform. The custom build above is complete and tested, and for anything that isn't a form, it's what I'd use.
The bottom line
Tracking a form? Add 2 lines.
Tracking your whole app? Build the route.
Test both before you spend.
Start your 7-day trial. Plans start at $20/month, billed yearly.