
Before you start
You need three things:
- A Collectform account with the form you want to automate already built.
- A Zapier account. The free tier works; it just polls for new submissions less often than paid plans.
- The destination app you want submissions to land in (Google Sheets, HubSpot, Salesforce, Slack, Mailchimp, and so on), with a Zapier connection you can authorize.
How the connection works
Before the steps, it helps to know the shape of the integration, because it explains a few things Zapier will and will not ask you.
| Detail | How it behaves |
|---|---|
| Authentication | A per-form API key (cf_live_…) that you paste into Zapier once. |
| Which form | The key itself selects the form, so Zapier never shows a form picker. |
| Trigger | Polling New Submission: Zapier checks for new entries on a schedule. |
| What triggers | Only completed submissions, newest first, deduplicated by submission ID. |
| How many per check | The 50 newest completed submissions each poll, which Zapier then dedupes. |
The key point: one key equals one form. To automate three forms, you generate three keys and make three connections. That keeps each form's data isolated and lets you revoke access to one form without touching the others.
Step 1: Open the Zapier integration on your form
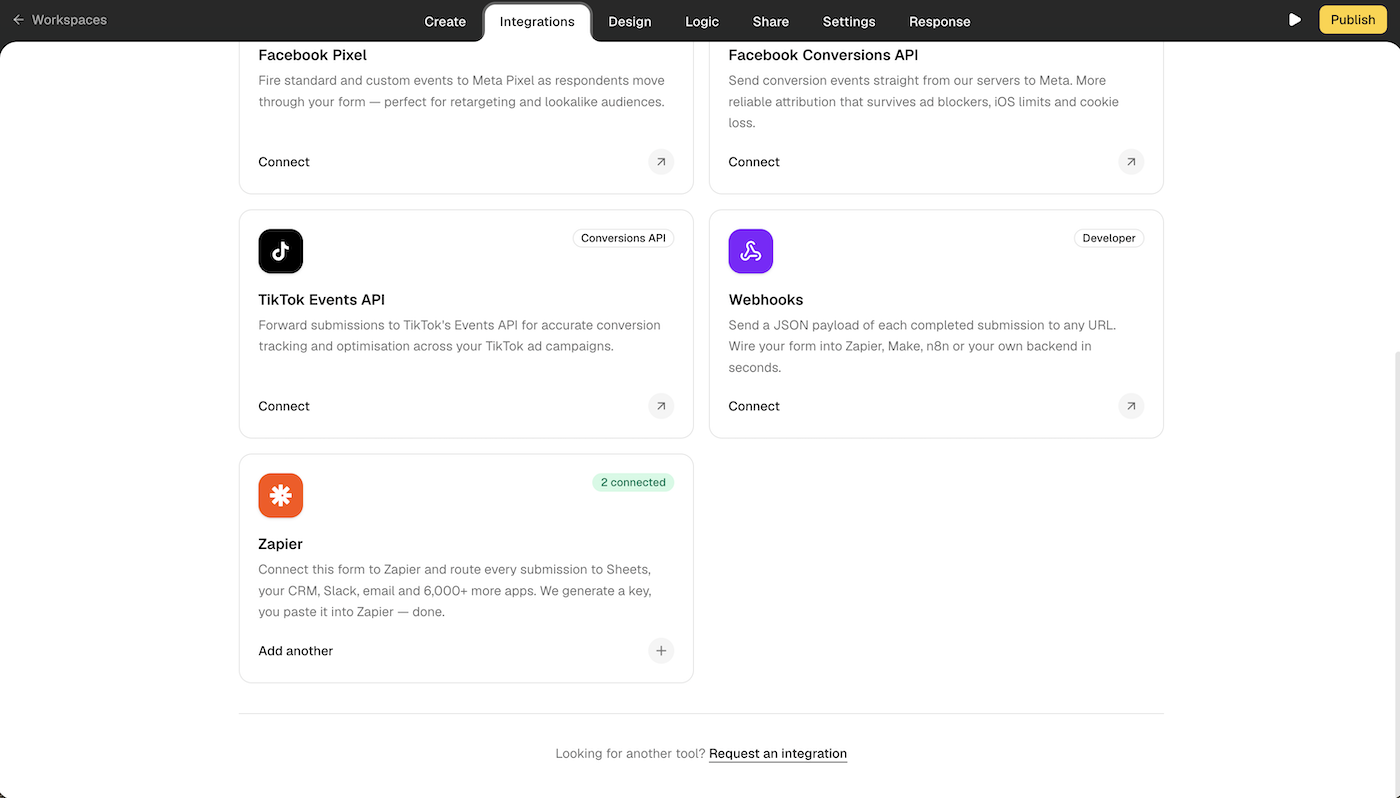
In Collectform, open the form you want to automate and go to the Integrations tab. You will see cards for pixels, Conversions API, Webhooks, and Zapier. Click Connect on the Zapier card.
A dialog opens titled Connect Zapier. You can give the connection a name to recognize it later (for example, "Sheets, homepage demo form"), though it is optional.
Step 2: Copy your form's API key
Collectform generates an API key for this form, shown in the dialog. It looks like this:
cf_live_a1b2c3d4e5f6a7b8c9d0e1f2a3b4c5d6
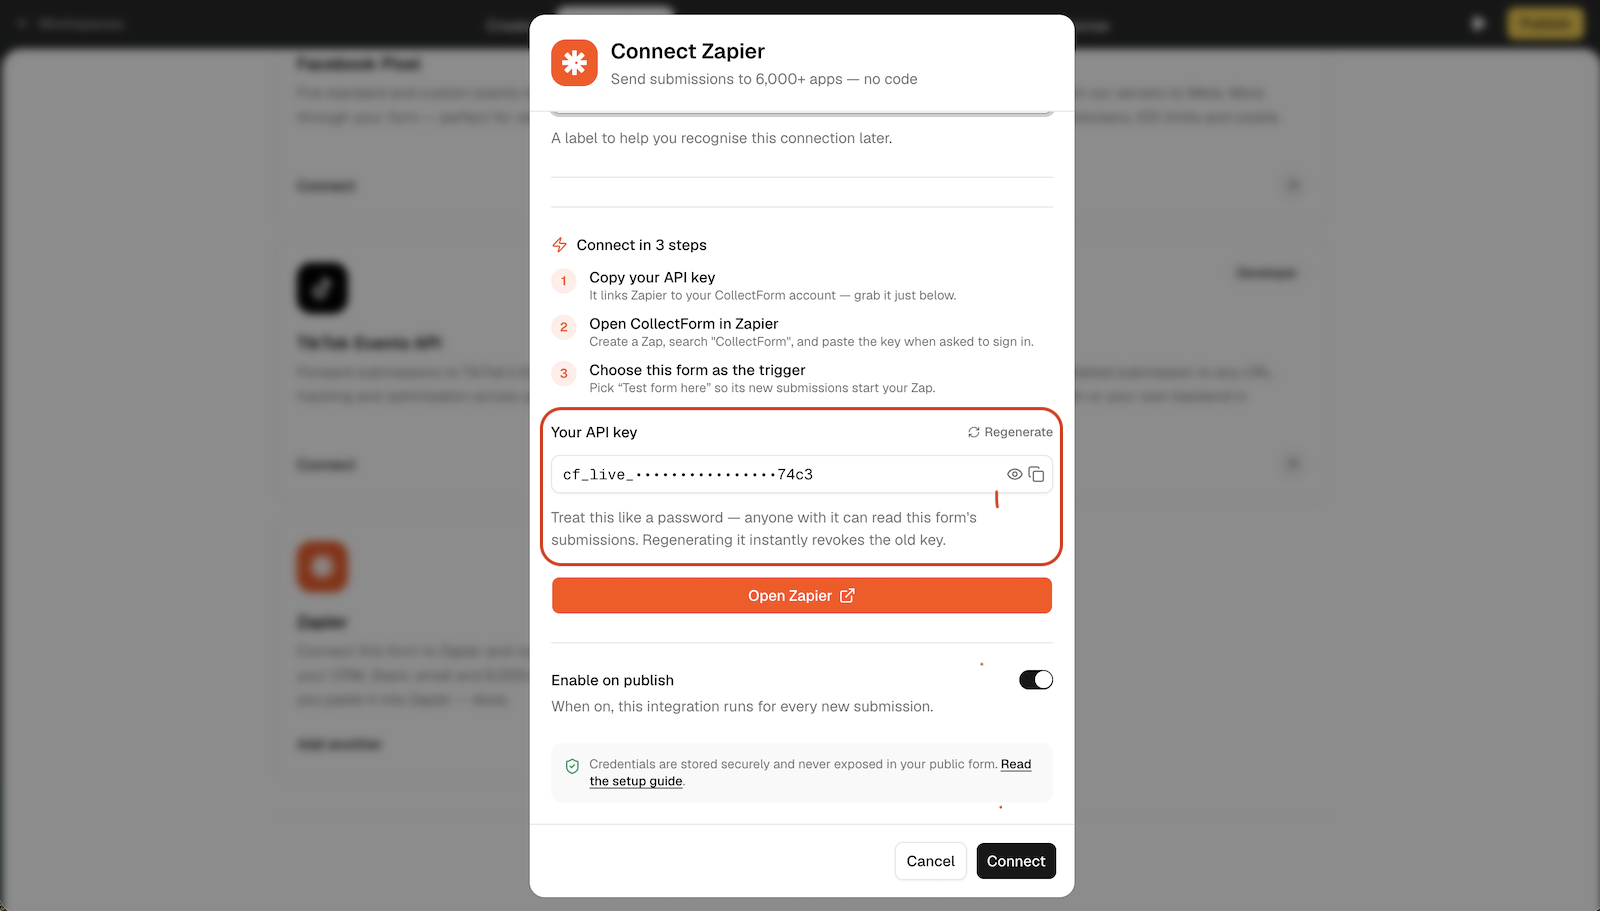
Click the eye icon to reveal it, then the copy icon to put it on your clipboard. Keep it somewhere safe for a moment.
Treat this key like a password. Anyone who has it can read this form's submissions, so do not paste it into public documents or client-side code. If it ever leaks, use Regenerate in the same dialog: that instantly revokes the old key and issues a new one.
Leave Enable on publish switched on, then click Connect to save the connection on the Collectform side.
Step 3: Create a Zap and connect your Collectform account
Switch to Zapier and click Create Zap (the Collectform dialog has an Open Zapier button that takes you straight there).
For the trigger app, search Collectform and select it. When Zapier prompts you to sign in to your Collectform account, choose to add a new connection and paste the API key you copied in Step 2. Zapier verifies the key and labels the connection with your form's name so you can tell connections apart later.
Step 4: Choose the New Submission trigger
Select New Submission as the trigger event.
Here is where the per-form key pays off: because the key you pasted already points at one specific form, Zapier does not ask you to choose a form. There is no dropdown to get wrong. Zapier simply watches that form.
When you test the trigger, Zapier pulls a recent submission so you can see the exact field names and sample values you will map in the next step. If the form has no submissions yet, send yourself one test entry first, then re-run the test.
Step 5: Add an action and map your fields
Now pick what happens with each submission. Add an action app and map your Collectform fields into it. A few common setups:
- Google Sheets: Create Spreadsheet Row, mapping each answer to a column.
- CRM (HubSpot, Salesforce, Pipedrive): Create or update a contact from the email, name, and phone fields.
- Slack: Send a channel message so sales sees each lead instantly.
- Email (Gmail, Outlook, Mailchimp): Send a notification or add the lead to a list.
Map the fields Zapier pulled from your sample submission into the destination app's fields. Because Collectform sends structured data per answer, the mapping is a straightforward drag of each field into place.
Step 6: Test and turn it on
Run Zapier's test for the action step and confirm the record shows up in your destination app exactly as expected. When it looks right, publish the Zap and switch it on.
From here, every new completed submission on that form flows into your action app automatically, on your Zapier plan's polling schedule.
Webhooks vs Zapier: which should you use?
Both live on the same Integrations tab, and they solve related problems in different ways.
| Zapier | Webhooks | |
|---|---|---|
| Best for | Connecting to apps with no code | Developers with their own endpoint |
| Delivery | Polling (checked on a schedule) | Real-time POST on each submission |
| Setup | Paste a key, map fields in Zapier | Point us at a URL, verify a signature |
| Data | Mapped per app | Raw JSON payload of the whole submission |
Use Zapier when your destination is one of its 6,000+ apps and you want zero code. Use Webhooks when you run your own backend and want each submission delivered instantly as JSON, optionally signed so you can verify it. You can even point a Webhook at a Zapier "Catch Hook" if you want real-time delivery inside Zapier.
Keep your API key safe
A few habits keep the connection secure:
- Never expose the key publicly. It is a read credential for this form's submissions. Keep it inside Zapier, not in front-end code or shared docs.
- Use one key per form. Isolating keys means revoking one form's access never breaks the others.
- Regenerate if in doubt. If a key may have leaked, hit Regenerate. The old key dies immediately, so remember to paste the new one into the matching Zapier connection or that Zap will go quiet.
Troubleshooting
- My Zap is not firing. Confirm the submission actually completed. Partial and abandoned responses never trigger the Zap. Also check that Enable on publish is on for the connection in Collectform.
- Zapier says my sign-in failed. The API key was probably copied with a stray space or is an old key you regenerated. Copy the current key again from the Collectform dialog and reconnect.
- New submissions take a while to arrive. That is polling, not an error. Free Zapier plans check roughly every 15 minutes. Upgrade your Zapier plan for faster polling, or use a Webhook for real-time delivery.
- I see no form to choose in Zapier. That is expected. The key selects the form, so there is no picker.
- I connected the wrong form. Each connection is tied to the key you pasted. Add a new Collectform connection in Zapier using the correct form's key, then point your Zap at it.
API reference (for developers)
This section documents every endpoint the Collectform Zapier integration calls, so the connection is fully transparent. A machine-readable OpenAPI 3.1 specification is published too, if you would rather import it.
You do not need any of this to use Zapier; the steps above cover the whole no-code flow. It is here for developers and for reference.
Base URL
https://api.collectform.com
Authentication
Every request is authenticated with a per-form API key sent in the X-API-Key header. You generate the key in the form builder under Integrations, Zapier (Step 2 above). The key is bound to a single form, so it both authenticates the request and selects which form's data is returned. There are no other credentials and no OAuth flow.
X-API-Key: cf_live_a1b2c3d4e5f6a7b8c9d0e1f2a3b4c5d6
A missing or unrecognized key returns 401:
{ "error": "Invalid or missing API key." }
GET /api/zapier/me
Tests the API key and returns the form it is bound to. Zapier calls this when a user connects their account, and uses formName as the connection label.
Request
curl https://api.collectform.com/api/zapier/me \
  -H "X-API-Key: cf_live_a1b2c3d4e5f6a7b8c9d0e1f2a3b4c5d6"
Response 200
{
  "formId": "a1b2c3d4e5f6g7h",
  "formName": "Homepage demo request",
  "label": "Sheets, homepage demo form"
}
GET /api/zapier/submissions
Backs the New Submission polling trigger. Returns up to the 50 newest completed submissions for the form, newest first. Zapier deduplicates across polls using each item's id, so there is no cursor or since parameter to manage. Submissions that were started but never completed are not returned.
Request
curl https://api.collectform.com/api/zapier/submissions \
  -H "X-API-Key: cf_live_a1b2c3d4e5f6a7b8c9d0e1f2a3b4c5d6"
Response 200 (an array, newest first)
[
  {
    "id": "r1a2b3c4d5e6f7g",
    "submittedAt": "2026-07-18T14:32:05.123Z",
    "formId": "a1b2c3d4e5f6g7h",
    "formName": "Homepage demo request",
    "fields": {
      "What's your email?": "[email protected]",
      "Full name": "Jane Doe",
      "Which plans interest you?": ["Pro", "Scale"]
    },
    "variables": {
      "score": 42
    },
    "hiddenFields": {
      "utm_source": "google"
    },
    "userData": {
      "fbp": "fb.1.1718900000000.1234567890",
      "fbc": "fb.1.1718900000000.AbCdEf"
    }
  }
]
Item structure
| Field | Type | Notes |
|---|---|---|
id | string | Unique, stable submission id. This is Zapier's dedupe key. |
submittedAt | string (ISO 8601) | When the submission was completed. |
formId | string | The form the key is bound to. |
formName | string | The form's title. |
fields | object | Answers keyed by question text (see below). |
variables | object | Computed logic variables keyed by variable name, for example a lead score. Empty {} when the form has none. |
hiddenFields | object | URL query params captured on load, limited to the form's allowed hidden-field list, for example utm_source. Empty {} when none were passed. |
userData | object | Ad click identifiers captured for conversion matching (fbp, fbc, ttp). Present only when the form has a Meta or TikTok integration, and may be empty {}. |
fields is keyed by each question's text so mappings read naturally in the Zap editor. A blank or duplicated question title falls back to the block id or a numbered suffix, so no answer silently overwrites another. Values match Collectform's webhook normalization and depend on the field type:
| Field type | fields value |
|---|---|
| Short text, long text, number, rating, scale | string or number |
| Email, website, phone | string |
| Country | the country label (string) |
| Single choice, dropdown | the selected value (string) |
| Multiple choice | array of selected values |
| Image choice | array of { value, image } |
| Date | ISO 8601 string |
| Contact info | object keyed by sub-field (for example firstName, email, phone) |
| Address | object keyed by sub-field; country resolves to its label |
| Swipe | array of { id, title, value, image } |
Status codes
| Code | Meaning |
|---|---|
200 | Success. |
401 | Missing or invalid X-API-Key. |
Polling behavior
Zapier polls /api/zapier/submissions on its own schedule, about every 15 minutes on Zapier's free plan and faster on paid plans. Because each poll returns the 50 newest completed submissions and Zapier dedupes by id, a submission only ever starts your Zap once, and neither side needs to store a cursor.
The bottom line
Connecting Collectform to Zapier is a five-minute, no-code job: copy your form's API key, paste it into Zapier, pick New Submission, map your fields, and turn it on. Because the key is tied to one form, Zapier knows exactly what to watch, and every completed submission flows straight into the tools your team already uses. When you need real-time delivery or full control of the payload, reach for Webhooks instead; for everything else, Zapier is the fastest way to put your leads to work.